

REPAIRING LARGE VOIDS

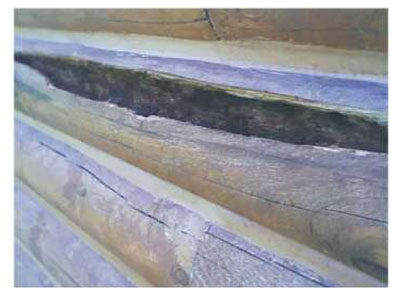
Step 1: Dig as much loose, friable wood fibers as you can out of the void or decayed zone.
Step 2: If the damage was caused by rot or insects (it usually is) the inner surfaces of the void should be saturated with Shell-Guard RTU. It is also a good idea to spray, or if there is an intact finish still in place, inject Shell-Guard RTU into the area surrounding the damage. This will kill any active fungi and/or insects and prevent the return of an infestation to the treated area. Allow a couple days for the Shell-Guard RTU to dry.


Step 3: Coat the inner surfaces of the void with M-Balm. You can use a brush or squeeze bottle to apply it, but the wood must be dry for it to work. You don’t have to wait until the M-Balm cures before proceeding to the next step since E-Wood bonds better to uncured M-Balm.
Step 4: You can start filling the void with E-Wood. If the void is large enough you can insert lengths of pressure treated 2x4s into it and pack the E-Wood around them. Just make sure that you don’t leave any large air pockets in the void. Cured E-Wood is structurally stronger than the wood itself. Don’t bring the surface of the E-Wood all the way out to the surface of the log, leave about 1/8” to 1/4” inch depressed in from the surface of the wood. Allow the E-Wood to harden.
Step 5: If the log has a stain on it sand the entire affected log down to bare wood. This will help prevent the repaired areas from standing out compared to the rest of the wall and will also remove any M-Balm or E-Wood that may have inadvertently adhered to the exterior surface of the logs.
Step 6: Fill in the 1/8” to 1/4” depression with a layer of Energy Seal. Choosing the right color is critical in order for the repaired area to blend in with the rest of the wall. If you are artistically creative you can texture the Energy Seal to match the surrounding wood and even use a different color Energy Seal to create wood grain and simulated knots.
Step 7: Allow the Energy Seal to dry for a few days then apply a matching Lifeline stain and topcoat to the entire sanded log. For repairing a log that does not carry any weight on it, such as a log end, a low-expansion urethane foam like our Pur Fill 1G foam may be used in place of the E-Wood to fill the void. Sections of 2x4s can still be used to help fill the void. Again, leave about 1/8” from the surface empty to later fill with Energy Seal. Never leave the urethane foam exposed to the environment for more than a few days. Direct sunlight degrades it fairly rapidly.
One thing to keep in mind about these types of repairs is that the repaired areas will weather differently than the rest of the wall and may take some special attention when it comes time to refinish the wall.

